Wednesday, July 20, 2011

Tin Can Candle Holders

I'm not sure if it's just me or not, but I always seem to have 5 or 6 cans of random canned goods that I never have, and never will, use. Currently I have a small stockpile of store bought canned peaches bought by my parents during a visit roughly 3 years ago. I'm not a fan of these. At. All. I've gotten quite spoiled by an aunt of mine that cans her own peaches and bestows upon me a few heavenly jars at a time. But, that's another story. The point is I keep forgetting to donate these canned goods to food drives (I feel like a terrible person) and they're just taking up my, fairly limited, kitchen cupboard space.

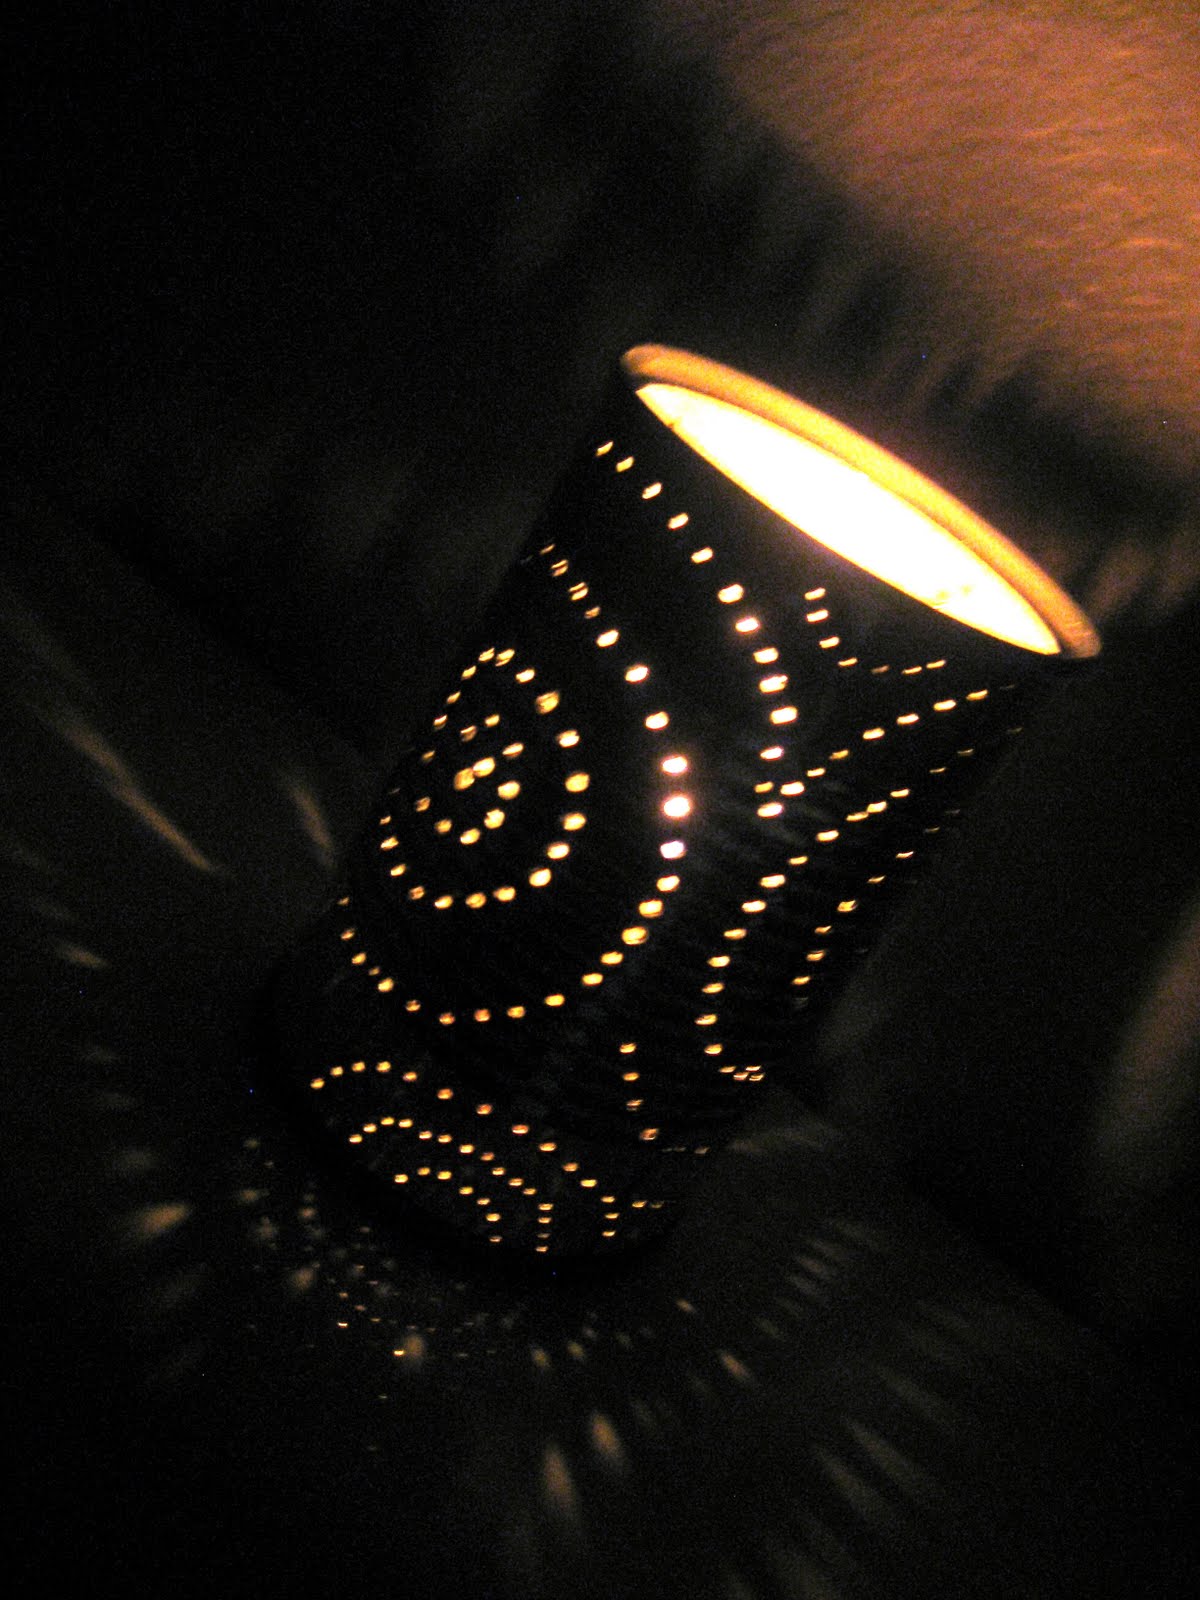
And then, out of nowhere, I was reminded of a project that I did during 2nd grade. Our teacher had us all bring in cans. We opened one end, washed out the cans, filled them with water and stuck them in the freezer. Once the water was frozen in the can we all marked designs on our cans. Anything we wanted with tiny dots of permanent marker. Then we were each presented with a hammer, a few nails, and an older student to help us. We then hammered the nail in a bit into each dot on the can. The ice prevented the can from denting in, and the nail and hammer created a pattern of holes all over the can. After we were done we let the ice melt out of the cans, dried out the insides and set small tea light candles inside. When lit the candlelight shines out of the holes producing a pretty pattern of light on the surrounding walls.

This project was a perfect way for me to use these canned peaches! It was fun and made me feel like a kid again. Plus it's literally a FREE diy project, that you're basically guaranteed to have supplies for! Unfortunately, I only had screws, no nails. But, It still worked just fine other than leaving a few blisters on my fingers!

**Update: I didn't think too far ahead by putting the holes all the way to the bottom of the can. You should leave the bottom bit unpunched, or else the melted wax will ooze out the bottom holes! Learn from my mistakes!

Monday, July 18, 2011

Orangina Bottles: Project 1


I am seriously addicted to Orangina. If you haven't tried it, it's basically carbonated orange juice. And it's amazing. There are a few different forms that Orangina is sold in, the run-of-the-mill plastic bottle, in a can (soda-style), and (my favorite) in gorgeous glass bottles. I buy these glass bottles of Orangina in six-packs at Trader Joes. Ever since I discovered these I've been trying to think of creative ways to re-use the bottles. I've come up with quite a list, but I'm just going to show you the first pr0ject I did using them. It's also definitely the easiest thing to do with them, other than the obvious vase option. But, I think we're all a little more creative than that, yes?


Step 1:
Buy Orangina and drink it (YUM.)

Step 2:
Remove the lid, the lid band (use sharp objects at your own risk as I did with my cuticle trimmers), and the label (it comes off very easily by peeling as much off as you can when it's dry, and then using warm water to scrub off the rest)

Step 3:
Find some sort-of cheap sconce . I bought mine a billion years ago at Walmart (I think) for next to nothing. They're not the fanciest, but they work.


Step 4:
Find something that you like the look of or that has some special meaning to you that will fit through the opening of the bottle. I have a soft spot for Maine so I used some sand from there as well as a collection of teeny tiny shells that I had collected.

Step 5:
Fill your bottles to your desired fullness. I didn't want them filled too much because I wanted the Orangina bottles to be as much of a star as the sand/shells.

Step 6:
Hang your sconces and set the Orangina bottles on them instead of candles. Voila. Wasn't that easy?


Monday, June 20, 2011

Painted Flower Pots

I have what some people refer to as a "black thumb". I absolutely, positively, kill any plant I come in contact with. Last summer I received a gorgeous plant for my birthday and proudly kept it alive for approximately 8 months before it withered into non-existence. This "black thumb" is especially problematic because I would genuinely like to grow some plants. I love flowers, and would adore some fresh grown herbs to cook with (especially since I received a ton of seed packets while I was volunteering a few months back). On my wish list is Dill weed (my favorite to cook with), Thyme, Rosemary, Sage, Basil, and Oregano. I also wouldn't turn up my nose to some Lavender and maybe even an Aloe Vera plant! Anyways, after MUCH deliberation, I have decided that the best way to begin this endeavor would be to play to my strengths. So, I'm starting with the flower pots (or herb pots as the case may be). I've always had a things for trees with no leaves. I love the way the branches remind me of lace. So, therein lies my project. Flower pots with trees painted on them! I began by purchasing 4 (to start with) pots at Michaels for 2 dollar apiece. And luckily I already had some white spray paint lying around from a current project I'm working on--spray-painting 2 adirondack chairs that I recently bought on ebay (you'll get to see that project on here soon, as well). So all I really needed to do was make a quick trip to Home Depot to pick up some bronze metallic spray paint for the base and the rim of the pot and a little espresso colored regular paint to use to paint a simple tree design on the main part of the pot . Here is the end result, from the original pot, to the spray-painted pot, to the final product! The tree isn't the most spectacular painting in existence, (obviously) but I'm quite proud of the overall look! Now, I just need to get my butt in gear and grow some stuff!

Sunday, June 19, 2011

Wine Cork Pendant!


I've been wanting to do some projects using wine corks for quite some time, and finally I've found my inspiration! I have some friends who work at wineries in Walla Walla, Washington and after not too much convincing (No convincing needed at all, really. I have fantastic friends! Be jealous.) they agreed to help me get my hands on a ton of used corks! I started on my first project using said corks a couple of days ago. Unfortunately, this project is requiring FAR more corks than I could ever have imagined, resulting in my running out of them before finishing! Luckily, the very same friends are willing to continue collecting them for me, which is good since I have a few more d.i.y. cork items in mind! (Do yourself a favor and google wine cork bath mat-- Flipping GENIUS!)

For my current project I'm using a styrofoam ball, hot glue, and, obviously, used wine corks! I plan on hanging it from the ceiling, probably, in my living room. (I keep wanting to refer to this project as a wine cork pendant? But, is pendant the right word? It certainly sounds better than "Hanging Wine Cork Ball", doesn't it? I think I'll go with pendant!) I'm posting a picture of how it looks so far, though bare in mind that it's not finished! So, definitely ignore the flower pot that it's in--it's just how I'm storing it until I can collect enough wine corks to finish it! Also, ignore any white styrofoam that might be showing through, I'll be covering that up with paint once I'm done gluing on the corks! Once that's all done, I just need to figure out how best to hang it! I'm open to suggestions!

Friday, June 3, 2011

I put the Dee in DIY!

I adore DIY! It's such a great way to express yourself creatively while also getting something useful out of the deal! And it definitely makes it easier to get that new "something" JUST the way you like it, and for the most part for far cheaper than you would've paid in a store. Not to mention the added benefit of not having to browse through a dozen stores trying to find what you want at a price that you can actually afford!

Here's a few examples of my projects! The picture to the left is of some pillows I made for my parents house over Christmas! Behind the pillows in the picture is a pair of frames I got on clearance. I don't have a picture of the final product of that project, but basically I used the same fabric I used for the pillows as the backing for the picture frame, then I combed a couple of beaches in Maine for a TON of tiny pebbles (roughly matching in size) and hot glued them into the frame in a swirling pattern. It was VERY cheap and turned out quite cute (not all of the projects I come up with do!). The pillows were cheaper than store bought and it wasn't hard to find clearance fabrics. Also I prefer the pillow stuffing rather than the pillow forms because it gives me more control over the size and shape. This is especially convenient when you're not entirely sure what you want to do yet, which is nearly always the case with me! Plus the stuffing can be REALLY cheap. You can also find some very expensive stuffing, but, for me, I don't find it necessary!

The picture on the right is a rug that I also made over Christmas for my parents. It is made with rug canvas, long strips of fabric and a locker hook. It is not the most cost effective project unless you're able to find fabric that you like (this one took 10 yards) for VERY cheap. If you're just looking for a low cost rug then this is not the method I would use. It also takes quite a chunk of time to make one of these, depending of course, on the size you choose to do. However, that's not a problem for me since I enjoy doing them as a mindless activity when I'm watching tv, etc.. This rug is also quite useful if you're trying to match it to specific things. It's also a great way to use up leftover materials as you can change the fabric print whenever you want. I would point out, however, that the rug is substantially easier when all of the fabric is the same type. Cotton seems to work the best, but I'm wanting to try one with jersey, because I think it would be super cozy! let me also point out that the lighting in the picture was terrible and the rug is MUCH more attractive in real life! :) Oh, and did I mention that these can be washed?! Yep. Throw 'em in the wash machines when they get dirty (you should obviously still pre-was the fabric before making the rug, as well!)!

The hat shown below was made using a pattern that I got from a store on Etsy. Etsy is one of my favorite places to shop. It's such a fantastic way for original designers, artists, and, well, pretty much any type of creative person you can imagine, to showcase their work, and, hopefully, make a little cash while doing it. The store that I bought this pattern from is here: http://www.etsy.com/people/pixiebell I can't say enough good things. I believe that this pattern was called the "Seed Beret". The pattern was straightforward and simple once I got the hang of it. Especially considering that I had never crotcheted anything before in my life (may I recommend youtube instructional videos for learning how to do just about anything)! And whipping out one of these hats is ridiculously fast (last minute gift idea, anyone?!). I just loved the way it turned out, and my friend, Jeanine, didn't mind it at all either!


Well, that's enough DIY talk for one day! I just love how popular DIY has become, and how simple it is to find great ideas for just about anything online! I'm always looking for my next project or inspiration! I think if everyone did a little DIY then the world would be just a little better!

Wednesday, June 1, 2011

No-Knead Bread is Dee-licious!

Seriously. This is some GOOD bread. The first time I made it I found it frustrating and complicated, and the results weren't the best...it became a sticky soupy mess that made it quite difficult to follow, well, almost all of the steps! However, after thorough research I realized that using bread flour rather than all-purpose flour and reducing the 1 5/8 cups water that many of the recipes call for to 1 1/2 cups water (this is the amount that Mark Bittman used in a video I found online) yielded beautiful results. Easy peasy! Also, I've found that mixing up the recipe in the afternoon, letting it rise overnight and then doing the second raise and baking while I get ready in the morning means that I get a slice of fresh bread to start my day! I've also started playing around with the recipe a bit. I've made one loaf with thyme and rosemary (GREAT!), another loaf with dill weed (a bit bland, this one needs more work), and yet another with craisins (Also GREAT!). I've yet to have a loaf fail (other than my initial attempt) and the mix-ins make it so easy to customize. It's also a super easy and cheap gift to let someone know you're thinking of them! Do it!

P.S. Pardon the picture quality, it was a spur-of-the-moment cellphone shot! ;)

Monday, May 30, 2011

Mexico

I totally do!

This past March I had the enormous privledge of going back to an orphanage in Mexico for the second time. I went a few years ago for a spring break and I most certainly plan on going back for a third and a forth time! The orphanage is located in a small town called Ejido Uruapan. I learned that "Ejido" is actually a word in front of the town name that basically means that the town is owned by the government. Learn something new everyday, eh? The orphanage is fairly close to Ensenada, which is a popular destination for cruise ships. The cruise ships take day trips out to La Bufadora, which is a great place to get souvenirs if you want good deals. Ensenada tends to be a massive rip-off, often charging three times the amount for the exact same items that they sell at La Bufadora.


The two places we went when we weren't at the orphanage!


The orphanage is different from what you normally think of when hearing the word "Orphanage". Many of the children have parents that simply cannot afford to take care of them. But unlike in a traditional orphanage most of these kids actually go stay with their families on the weekends.


On the trampoline with some of the kids (And they all fall down!)


I don't speak much Spanish (I'm in my second year of the Spanish in college), but I went with my friend Tiffany who speaks Spanish fluently and actually lived at the orphanage for 6 months a few years ago. So I definitely have an in when I go down there! I know all of the best taco stands/ bakeries/ souvenir stands (We have our picture on the wall of Big Burro, the best taco stand EVER) in Ensenada! Oh and did I forget to mention the hot springs right by the orphanage itself, in Uruapan! Bliss!

My major is Social Work, so going back down there was the most positive experience I can imagine. When I come back up to the States after being down in Mexico I'm always hit with an overwhelming appreciation for all those things that I take for granted. It also gives me such compassion for illegal immigrants. Things are not always as black and white as they seem, and I think being reminded of that is a necessary thing in my life! (Oh and if you think there's a ton of pictures on this blog entry then you shoulda seen how many I WANTED to add!)


Augustine (used to be called Frijolito, then Frijol, and now that he's all grown up he wants to be called by his actual name! CUTE!)


Making pizza with the kids! No easy feat when trying to bake multiple
personal pizzas for over 20 kids with only one oven!


The view from the orphanage!


Eating fresh churros and buying souvenirs from the car while waiting
in the endless line at the border!


At the beach in Ensenada!


San Dee-iego!

There are MANY places that I want to travel (Greece, Russia, Norway, France, England, Ireland, Germany, etc. etc.)! But if I had to pick the one place that I most want to live, I'd have to say San Diego. Hands down! I just love this place! I don't know what it is, especially because I've lived in so many places. Although, come to think of it, maybe that's exactly how I know. Over the years I've been able to really hone in on what I do and don't like about places. San Diego just feels RIGHT. Like it's just been waiting for me all these years to show up. And as soon as I graduate from college that's exactly what I'm going to do!

Oh and for anyone who lives in San Diego/is going to visit, you should probably go check out Extraordinary Desserts. It's good. Seriously. Good. Other recommendations: Coronado Island is great for a super relaxing day. Fashion Valley Mall is amazing for some shopping (And boy do I love shopping! Is that too cliché?!). And the Gaslamp Quarter is amazing for night life! And I'm excited to explore more in the future! And for those of you who know San Diego intimately...GIVE ME SUGGESTIONS!! :) I'm sure that my favorite places are relatively trite to those that live there and know all of the non-tourist places!